The cell object is a child object of the worksheet object. Use the properties and methods of the cell object to set and modify it.
【Excel VBA】 First, create or get a workbook object bk:
Set bk = Workbooks.AddThe newly added workbook is named "Workbook1" and contains a worksheet named "Sheet1". Get this worksheet and assign it to variable sht:
Set sht = bk.Worksheets(1)By default, the newly added worksheet is the active worksheet, so you can also reference it as follows:
Set sht = bk.ActiveSheet
strName = sht.Name 'Sheet1
【Python xlwings】 First, import the xlwings package:
>>> import xlwings as xwThen create a workbook object bk using the Book method:
>>> bk = xw.Book()A worksheet named "Sheet1" is automatically added to the new workbook. Get this worksheet and assign it to variable sht:
>>> sht = bk.sheets(1)By default, the newly added worksheet is the active worksheet, so you can also reference it as follows:
>>> sht = bk.sheets.active
>>> sht.name
'Sheet1'
Referencing Cells
Referencing cells means finding them—this is the prerequisite for subsequent operations. Below are introductions to referencing single cells, multiple cells, the current cell, referencing by cell name, and referencing by variable.
1. Referencing a Single Cell
Use the Range(range, api.Range) property and Cells(cells, api.Cells) property of the worksheet object to reference a single cell. If using Python xlwings, you can also use square brackets. Below is an example of referencing and selecting cell A1 in worksheet sht:
【Excel VBA】
sht.Range("A1").Select
sht.Cells(1, "A").Select
sht.Cells(1, 1).Select
【Python xlwings】
>>> sht.range('A1').select()
>>> sht.range(1, 1).select()
>>> sht['A1'].select()
>>> sht.cells(1, 1).select()
>>> sht.cells(1, 'A').select()
【Python xlwings API】
>>> sht.api.Range('A1').Select()
>>> sht.api.Cells(1, 'A').Select()
>>> sht.api.Cells(1, 1).Select()
2. Referencing Multiple Cells
Use the Range(range, api.Range) property of the worksheet object to reference multiple cells—pass a string composed of the coordinates of each cell as a parameter. If using Python xlwings, you can also use square brackets. Below is an example of referencing and selecting cells B2, C5, and D7 in worksheet sht:
【Excel VBA】
sht.Range("B2, C5, D7").Select
【Python xlwings】
>>> sht.range('B2, C5, D7').select()
>>> sht['B2, C5, D7'].select()
【Python xlwings API】
>>> sht.api.Range('B2, C5, D7').Select()The running effect is shown in Figure 1-9.
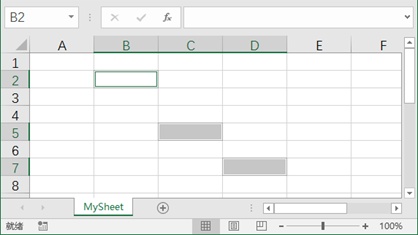
Figure 1-9
3. Referencing the Current Cell
In Excel VBA, use the ActiveCell property of the Application object to reference the active cell in the active worksheet of the active workbook. Below is an example of adding value 3.0 to cell C3 in worksheet sht: select it first, then use the ActiveCell property to get the value of the current cell.
sht.Range("C3").Value = 3.0
sht.Range("C3").Select
sngA = ActiveCell.Value '3.0
Using xlwings: First, get all keys of the Application object using the apps property of xlwings, then get the current Application object by index. Assign 3.0 to cell C3, select it, and use Python xlwings API to get the value of the ActiveCell property. Selecting a cell makes it the active cell.
>>> pid = xw.apps.keys()
>>> app = xw.apps[pid[0]]
>>> sht['C3'].value = 3.0
>>> sht['C3'].select()
>>> a = app.api.ActiveCell.Value
>>> a
3.0
4. Referencing by Cell Name
If a cell has a name, you can reference it by that name. Below is an example of setting the name of cell C3 to "test" and then referencing it by that name:
【Excel VBA】
Set cl = sht.Range("C3")
cl.Name = "test"
sht.Range("test").Select
【Python xlwings】
>>> cl = sht.cells(3, 3)
>>> cl.name = 'test'
>>> sht.range('test').select()
【Python xlwings API】
>>> cl = sht.api.Range('C3')
>>> cl.Name = 'test'
>>> sht.api.Range('test').Select()
5. Referencing by Variable
In programming, you often need to dynamically set cell coordinates—this requires using variables. When using the Range(range) property of the cell object to reference cells, you can first convert the numeric part of the row or column number to a string, then combine them into a complete coordinate string for reference. When using the Cells(cells) property, convert the data type if necessary. Below is an example of referencing cell C3 using a variable:
【Excel VBA】
intI = 3
Debug.Print sht.Range("C" & CStr(intI)).Value
Debug.Print sht.Cells(intI, intI).Value
【Python xlwings】
>>> i = 3
>>> sht.range('C' + str(i)).value
>>> sht.cells(i, i).value
【Python xlwings API】
>>> i = 3
>>> sht.api.Range('C' + str(i)).Value
>>> sht.api.Cells(i, i).Value
Referencing Entire Rows and Columns
Referencing Entire Rows
In Excel VBA and Python xlwings API, use the Rows property and Range property of the worksheet object. The Rows property has one parameter specifying the row number to reference. When using the Range property, pass a string in the form "row number:row number" as a parameter, or reference any cell in the row and then use the EntireRow property to get the entire row. In Python xlwings, you can also use square brackets. Below is an example of referencing and selecting the first row:
【Excel VBA】
sht.Rows(1).Select
sht.Range("1:1").Select
sht.Range("A1").EntireRow.Select
【Python xlwings】
>>> sht.range('1:1').select()
>>> sht['1:1'].select()
【Python xlwings API】
>>> sht.api.Rows(1).Select()
>>> sht.api.Range('1:1').Select()
>>> sht.api.Range('A1').EntireRow.Select()
Referencing multiple rows is similar to referencing a single row—just specify the start and end row numbers separated by a colon. Specify a cell area spanning multiple rows and use the EntireRow property to reference the continuous multiple rows occupied by the area. Below is an example of referencing and selecting rows 1–5 in worksheet sht:
【Excel VBA】
sht.Rows("1:5").Select
sht.Range("1:5").Select
sht.Range("A1:C5").EntireRow.Select
【Python xlwings】
>>> sht.range('1:5').select()
>>> sht['1:5'].select()
>>> sht[0:5, :].select()
【Python xlwings API】
>>> sht.api.Rows('1:5').Select()
>>> sht.api.Range('1:5').Select()
>>> sht.api.Range('A1:C5').EntireRow.Select()
Note the reference method sht[0:5, :] in Python xlwings: the second colon in the square brackets is slice notation, indicating that the comma before specifies all columns of continuous multiple rows.
Referencing Entire Columns
In Excel VBA and Python xlwings API, use the Columns property and Range property of the worksheet object. The Columns property has one parameter specifying the column number to reference (can be数字 or letter). When using the Range property, pass a string in the form "column number:column number" as a parameter, or reference any cell in the column and then use the EntireColumn property to get the entire column. Below is an example of referencing and selecting column A:
【Excel VBA】
sht.Columns(1).Select
sht.Columns("A").Select
sht.Range("A:A").Select
sht.Range("A1").EntireColumn.Select
【Python xlwings】
>>> sht.range('A:A').select()【Python xlwings API】
>>> sht.api.Columns(1).Select()
>>> sht.api.Columns('A').Select()
>>> sht.api.Range('A:A').Select()
>>> sht.api.Range('A1').EntireColumn.Select()
Referencing multiple columns is similar to referencing a single column—just specify the start and end column numbers separated by a colon. Specify a cell area spanning multiple columns and use the EntireColumn property to reference the continuous multiple columns occupied by the area. Below is an example of referencing and selecting columns B and C in worksheet sht:
【Excel VBA】
sht.Columns("B:C").Select
sht.Range("B:C").Select
sht.Range("B1:C2").EntireColumn.Select
【Python xlwings】
>>> sht.range('B:C').select()
>>> sht[:, 1:3].select()
【Python xlwings API】
>>> sht.api.Columns('B:C').Select()
>>> sht.api.Range('B:C').Select()
>>> sht.api.Range('B1:C2').EntireColumn.Select()
Referencing Areas
An "area" refers to a rectangular area of m×n cells obtained by continuously referencing cells in the row and column directions. A cell can be regarded as a special area of size 1×1. This section covers referencing general areas, areas constructed from active cells, areas constructed by offset, referencing areas by name, and referencing cells within an area.
1. Referencing General Areas
To reference a general area, specify the coordinates of the top-left and bottom-right cells of the area, separate them with a colon to form a string as the sole parameter of the Range(range) property of the worksheet object, or use them as two parameters of the Range(range) property. When specifying the coordinates, you can also use the Range(range) property or Cells(cells) property of the worksheet object. Below is an example of referencing and selecting area A3:C8:
【Excel VBA】
sht.Range("A3:C8").Select
sht.Range("A3", "C8").Select
sht.Range(sht.Range("A3"), sht.Range("C8")).Select
sht.Range(sht.Cells(3, 1), sht.Cells(8, 3)).Select
【Python xlwings】
>>> sht.range('A3:C8').select()
>>> sht.range('A3', 'C8').select()
>>> sht.range(sht.range('A3'), sht.range('C8')).select()
>>> sht.range(sht.cells(3, 1), sht.cells(8, 3)).select()
>>> sht.range((3, 1), (8, 3)).select()
【Python xlwings API】
>>> sht.api.Range('A3:C8').Select()
>>> sht.api.Range('A3', 'C8').Select()
>>> sht.api.Range(sht.api.Range('A3'), sht.api.Range('C8')).Select()
>>> sht.api.Range(sht.api.Cells(3, 1), sht.api.Cells(8, 3)).Select()
The running effect is shown in Figure 1-10.

Figure 1-10
2. Referencing Areas Constructed from Active Cells
When the start or end of the area is the active cell, replace it with the reference to the active cell. Below is an example of specifying the top-left cell of the area as A3, the bottom-right cell as the active cell, and selecting the area:
【Excel VBA】
sht.Range("A3", ActiveCell).Select
【Python xlwings API】
>>> sht.api.Range('A3', app.api.ActiveCell).Select()3. Referencing Areas Constructed by Offset
Offsetting an existing area as a whole yields a new area. Use the Offset(offset) method of the area object for offsetting. There are differences in usage among the three methods:
In Excel VBA and Python xlwings, the Offset(offset) method translates the given area as a whole.
In Python xlwings API, the Offset method can only translate the top-left corner of the area. Thus, for the latter, translate the top-left and bottom-right corners separately, then recombine them into an area for selection.
For Excel VBA and Python xlwings:
When only one parameter is given, it indicates vertical offset (positive = down, negative = up).
When two parameters are given:
If the first parameter is 0, it indicates horizontal offset (positive = right, negative = left).
If both parameters are non-zero, it indicates offset in both vertical and horizontal directions.
For Python xlwings API, the difference is that the base is 1 (i.e., where Excel VBA/Python xlwings uses 0, Python xlwings API uses 1; where they use 1, Python xlwings API uses 2).
【Excel VBA】
sht.Range("A3:C8").Offset(1).Select 'A4:C9
sht.Range("A3:C8").Offset(0, 1).Select 'B3:D8
sht.Range("A3:C8").Offset(1, 1).Select 'B4:D9
【Python xlwings】
>>> sht.range('A3:C8').offset(1).select() #A4:C9
>>> sht.range('A3:C8').offset(0, 1).select() #B3:D8
>>> sht.range('A3:C8').offset(1, 1).select() #B4:D9
【Python xlwings API】
>>> sht.api.Range(sht.api.Range('A3').Offset(2), sht.api.Range('C8').Offset(2)).Select() #A4:C9
>>> sht.api.Range(sht.api.Range('A3').Offset(1, 2), sht.api.Range('C8').Offset(1, 2)).Select() #B3:D8
>>> sht.api.Range(sht.api.Range('A3').Offset(2, 2), sht.api.Range('C8').Offset(2, 2)).Select() #B4:D9
4. Referencing Areas by Name
If an area has a name, you can reference it by that name. Below is an example of naming area A3:C8 as "MyData" and then referencing it by that name:
【Excel VBA】
Set cl = sht.Range("A3:C8")
cl.Name = "MyData"
sht.Range("MyData").Select
【Python xlwings】
>>> cl = sht.range('A3:C8')
>>> cl.name = 'MyData'
>>> sht.range('MyData').select()
【Python xlwings API】
>>> cl = sht.api.Range('A3:C8')
>>> cl.Name = 'MyData'
>>> sht.api.Range('MyData').Select()
5. Referencing Cells Within an Area
There are three methods to reference cells within an area: coordinate indexing, linear indexing, and slicing.
Coordinate Indexing
The coordinates of a cell within the area are relative coordinates calculated from the top-left corner of the area (same as area offset calculation). Note that Python xlwings uses a base of 0, while the other two methods use a base of 1.
【Excel VBA】
Dim Rng As Object
Set Rng = sht.Range("B2:D5")
Rng(1, 1).Select 'B2
【Python xlwings】
>>> rng = sht.range('B2:D5')
>>> rng[0, 0].select() #B2(base 0)
【Python xlwings API】
>>> rng = sht.api.Range('B2:D5')
>>> rng(1, 1).Select()
Linear Indexing
Linear indexing uses a single parameter—the index is assigned by numbering cells in the area row by row, column by column. Note that in Python xlwings, numbering starts at 0:
0 1 2
3 4 5
In Python xlwings API, numbering starts at 1:
1 2 3
4 5 6
For the given area B2:D5, use linear indexing to reference cell D2:
【Excel VBA】
Dim Rng As Object
Set Rng = sht.Range("B2:D5")
Rng(3).Select
【Python xlwings】
>>> rng = sht.range('B2:D5')
>>> rng[2].select()
【Python xlwings API】
>>> rng = sht.api.Range('B2:D5')
>>> rng(3).Select()
Slicing (Python xlwings Only)
In Python xlwings, slicing can extract contiguous data from within the area:
>>> rng = sht.range('B2:D5')
>>> rng[1:3, 1:3].select() #Slice C3:D4
>>> rng[:, 2].select() #Slice D2:D5
Referencing All Cells, Special Areas, and Collections of Areas
This section covers referencing all cells, special areas, and collections of areas.
1. Referencing All Cells
In Python xlwings, use the cells property of the worksheet object to reference all cells in the worksheet. In the other two methods, you can also reference all rows or all columns.
【Excel VBA】
sht.Cells.Select
sht.Range(sht.Cells(1, 1), sht.Cells(sht.Cells.Rows.Count, sht.Cells.Columns.Count)).Select
Examples of referencing all rows:
sht.Rows.Select
Examples of referencing all columns:
sht.Columns.Select
【Python xlwings】
>>> sht.cells.select()【Python xlwings API】
>>> sht.api.Cells.Select()
>>> sht.api.Range(sht.api.Cells(1, 1), sht.api.Cells(sht.api.Cells.Rows.Count, sht.api.Cells.Columns.Count)).Select()
Examples of referencing all rows:
>>> sht.api.Rows.Select()Examples of referencing all columns:
>>> sht.api.Columns.Select()2. Referencing Special Areas
Special areas include multiple areas, the current region of a given cell, and the used range of a worksheet.
1) Referencing Multiple Areas at Once
When using the Range(range) property of the worksheet object to reference multiple areas at once, separate the areas with commas (each area is represented by the coordinates of its top-left and bottom-right cells, separated by a colon). Below is an example of referencing and selecting 3 areas (A2, B3:C8, E2:F5) in worksheet sht:
【Excel VBA】
sht.Range("A2, B3:C8, E2:F5").Select
【Python xlwings】
>>> sht['A2, B3:C8, E2:F5'].select()
>>> sht.range('A2, B3:C8, E2:F5').select()
【Python xlwings API】
>>> sht.api.Range('A2, B3:C8, E2:F5').Select()The running effect is shown in Figure 1-11.
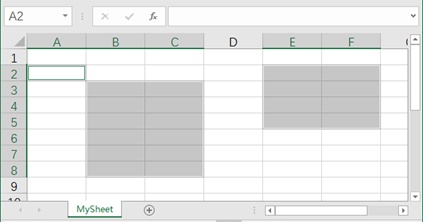
Figure 1-11
2) Referencing the Current Region of a Given Cell
What is the "current region" of a given cell? The shaded part in Figure 1-12 represents the current region of cell C3. The current region of a cell is the smallest rectangle containing data obtained by expanding the cell upward, downward, leftward, and rightward until it is first surrounded by a rectangular ring of empty rows/columns (empty within the region, not the entire row/column).
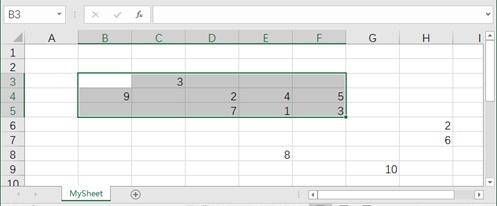
Figure 1-12
In Python xlwings, use the current_region property of the cell object; in Excel VBA or Python xlwings API, use the CurrentRegion property.
【Excel VBA】
sht.Range("C3").CurrentRegion.Select
【Python xlwings】
>>> sht.range('C3').current_region.select()【Python xlwings API】
>>> sht.api.Range('C3').CurrentRegion.Select()3) Referencing the Used Range of a Worksheet
The used range of a worksheet is the smallest area containing all data. In Python xlwings, use the used_range property of the cell object; in Excel VBA and Python xlwings API, use the UsedRange property.
【Excel VBA】
sht.UsedRange.Select
【Python xlwings】
>>> sht.used_range.select()【Python xlwings API】
>>> sht.api.UsedRange.Select()The used range of worksheet sht with given cell data is shown in Figure 1-13.

Figure 1-13
3. Referencing Collections of Areas
Collection operations for areas include union and intersection. As shown in Figure 1-14, two rectangles overlap partially. The union of the two rectangles includes all shaded parts, and the intersection is the overlapping part (dark shaded area).
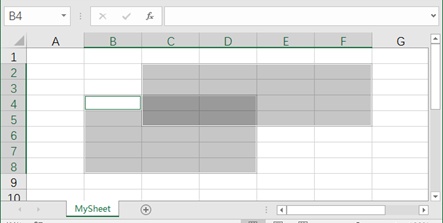
Figure 1-14
In Excel VBA and Python xlwings API, use the Union method of the Application object to get the union of two areas, and the Intersect method to get the intersection. Below is an example of calculating the union and intersection of areas B4:D8 and C2:F5:
【Excel VBA】
Union(sht.Range("B4:D8"), sht.Range("C2:F5")).Select
Intersect(sht.Range("B4:D8"), sht.Range("C2:F5")).Select
【Python xlwings API】
>>> app.api.Union(sht.api.Range('B4:D8'), sht.api.Range('C2:F5')).Select()
>>> app.api.Intersect(sht.api.Range('B4:D8'), sht.api.Range('C2:F5')).Select()
Extending References to Cell Areas in the Current Worksheet
Section 1.5.3 introduced area offset (translating an area as a whole to get a new area). This section introduces another method: extending an existing cell upward, downward, leftward, or rightward to get a new area. Use the Resize(resize) method of the cell object for extension. Note that the settings differ among the three methods:
In Excel VBA and Python xlwings, the Resize(resize) method directly returns the extended area.
In Python xlwings API, the Resize method only returns the cell at the extended position of the original cell. Thus, for the latter, first get the bottom-right cell of the area, then recombine it with the original cell to form an area.
If only one parameter is given, it indicates vertical extension (values > 1 = down, < 1 = up). If two parameters are given:
If the first parameter is 1, it indicates horizontal extension (values > 1 = right, < 1 = left).
If both parameters are not 1, it indicates extension in both vertical and horizontal directions.
Below is an example of extending cell C2 in three directions (vertical, horizontal, and both) to get new areas and select them:
【Excel VBA】
sht.Range("C2").Resize(3).Select 'C2:C4
sht.Range("C2").Resize(1, 3).Select 'C2:E2
sht.Range("C2").Resize(3, 3).Select 'C2:E4
【Python xlwings】
>>> sht.range('C2').resize(3).select() #Create area C2:C4
>>> sht.range('C2').resize(1, 3).select() #Create area C2:E2
>>> sht.range('C2').resize(3, 3).select() #Create area C2:E4
【Python xlwings API】
>>> sht.api.Range('C2', sht.api.Range('C2').Resize(3)).Select()
>>> sht.api.Range('C2', sht.api.Range('C2').Resize(1, 3)).Select()
>>> sht.api.Range('C2', sht.api.Range('C2').Resize(3, 3)).Select()
Create a 3-row-by-3-column area starting from the current cell:
【Excel VBA】
sht.Range(ActiveCell, ActiveCell.Resize(3, 3)).Select
【Python xlwings API】
>>> sht.api.Range(app.api.ActiveCell, app.api.ActiveCell.Resize(3, 3)).Select()In Python xlwings, use the expand method of the cell object for another type of extension. For a cell in an area, the expand method can get the row area from it to the right, the column area from it to the bottom, and the entire table area it belongs to. Note that expand only extends rightward and downward:
>>> sht.range('C4').expand('table').select()
>>> sht.range('C4').expand().select() #Equivalent to the above
>>> sht.range('C4').expand('down').select()
>>> sht.range('C4').expand('right').select()
The effect of expanding cell C4 using the expand method is shown in Figure 1-15.
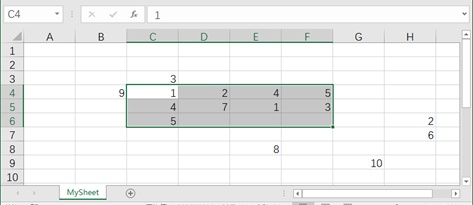
Figure 1-15
Referencing the Last Row or Last Column
Referencing the last row or last column means getting the row number of the last row or the column number of the last column of the data area.
There are two methods to reference the last row:
Start from a cell at the top and go downward—find the last non-empty row.
Start from the bottom of the worksheet and go upward—find the first non-empty row in the data area.
Use the End(end) method of the cell object. The example worksheet is shown in Figure 1-16. Different methods can be used to get the last row number and last column number of the data area. Note that Excel VBA and Python xlwings API use different enumeration constants.
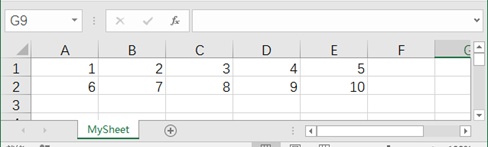
Figure 1-16
【Excel VBA】
intR = sht.Range("A1").End(xlDown).Row  						'2
intR = sht.Cells(1, 1).End(xlDown).Row  						'2
intR = sht.Range("A" & CStr(sht.Rows.Count)).End(xlUp).Row  	'2
intR = sht.Cells(sht.Rows.Count, 1).End(xlUp).Row  			'2
【Python xlwings】
>>> sht.range('A1').end('down').row
## 2
>>> sht.cells(1, 1).end('down').row
>>> sht.range('A1').end('down').row
## 2
>>> sht.cells(1, 1).end('down').row
## 2
>>> sht.range('A' + str(sht.api.Rows.Count)).end('up').row
## 2
>>> sht.cells(sht.api.Rows.Count, 1).end('up').row
## 2
【Python xlwings API】
>>> sht.api.Range('A1').End(xw.constants.Direction.xlDown).Row
## 2
>>> sht.api.Cells(1, 1).End(xw.constants.Direction.xlDown).Row
## 2
>>> sht.api.Range('A' + str(sht.api.Rows.Count)).\
End(xw.constants.Direction.xlUp).Row
## 2
>>> sht.api.Cells(sht.api.Rows.Count, 1).\
End(xw.constants.Direction.xlUp).Row
## 2
>>> sht.api.Cells(sht.api.Rows.Count, 1).\
End(xw.constants.Direction.xlUp).Row
## 2
Next, we use Python xlwings and Python xlwings API to reference the last column. There are also two methods to reference the last column: one is to start from a cell on the left and search rightward—the last column of the data region is the last non-empty column; the other is to start from the rightmost end of the worksheet and search leftward—the first non-empty column within the data region. When the parameter of the end method is right, it searches rightward; when it is left, it searches leftward.
【Excel VBA】
intC = sht.Range("A1").End(xlToRight).Column  				'5
intC = sht.Cells(1, 1).End(xlToRight).Column  					'5
intC = sht.Cells(1, sht.Columns.Count).End(xlToLeft).Column  	'5
【Python xlwings】
>>> sht.range('A1').end('right').column
## 5
>>> sht.cells(1, 1).end('right').column
## 5
>>> sht.cells(1, sht.api.Columns.Count).end('left').column
## 5
【Python xlwings API】
>>> sht.api.Range('A1').End(xw.constants.Direction.xlToRight).Column
## 5
>>> sht.api.Cells(1, 1).End(xw.constants.Direction.xlToRight).Column
## 5
>>> sht.api.Cells(1, sht.api.Columns.Count).\
End(xw.constants.Direction.xlToLeft).Column
## 5
## 5
## 5
Referencing Special Cells
Special cells refer to cells with empty content, cells with comments, cells with formulas, etc. The SpecialCells method of the cell object can be used to find these special cells. For Excel VBA and Python xlwings API, the reference format is as follows:
Range Object.SpecialCells(Type, Value)
The SpecialCells method has two parameters: Type is a required parameter representing the type of special cell (its values are shown in Table 1-2); Value is an optional parameter, which is set to necessary values when the value of the Type parameter is xlCellTypeConstants or xlCellTypeFormulas.
Table 1-2 Values of the Type Parameter
| Name | Value | Description |
|---|---|---|
| xlCellTypeAllFormatConditions | -4172 | Any formatted cell |
| xlCellTypeAllValidation | -4174 | Cell containing validation criteria |
| xlCellTypeBlanks | 4 | Empty cell |
| xlCellTypeComments | -4144 | Cell containing comments |
| xlCellTypeConstants | 2 | Cell containing constants |
| xlCellTypeFormulas | -4123 | Cell containing formulas |
| xlCellTypeLastCell | 11 | Last cell in the used range |
| xlCellTypeSameFormatConditions | -4173 | Cell with the same format |
| xlCellTypeSameValidation | -4175 | Cell with the same validation criteria |
| xlCellTypeVisible | 12 | All visible cells |
The following example uses the SpecialCells method to select empty cells in the current region of cell A1.
【Excel VBA】
sht.Range("A1").CurrentRegion.SpecialCells(xlCellTypeBlanks).Select【Python xlwings API】
>>> sht.api.Range('A1').CurrentRegion.SpecialCells(xw.constants.CellType.xlCellTypeBlanks).Select()The running effect is shown in Figure 1-17.
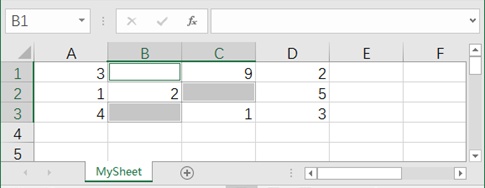
Figure 1-17 Selecting Empty Cells
Number of Rows, Columns, Top-Left Corner, Bottom-Right Corner, Shape, and Size of a Range
Below are several properties related to the dimension, shape, and size of a range.
Using the Rows and Columns properties of the range object to return the Count property of the object can obtain the number of rows and columns of the range. Below, we get the number of rows and columns of the used range of worksheet sht (using the data in Figure 1-16).
【Excel VBA】
sht.UsedRange.Rows.Count  		'2
sht.UsedRange.Columns.Count  	'5
【Python xlwings】
>>> sht.used_range.rows.count
## 2
>>> sht.used_range.columns.count
## 5
【Python xlwings API】
>>> sht.api.UsedRange.Rows.Count
## 2
>>> sht.api.UsedRange.Columns.Count
## 2
>>> sht.used_range.columns.count
## 5
>>> sht.api.UsedRange.Rows.Count
## 2
>>> sht.api.UsedRange.Columns.Count
## 5
Using the Row and Column properties of the range object can obtain the coordinates of the top-left corner cell of the range, i.e., its row number and column number.
【Excel VBA】
sht.UsedRange.Row  		'1
sht.UsedRange.Column  	'1
【Python xlwings】
>>> sht.used_range.row
## 1
>>> sht.used_range.column
## 1
【Python xlwings API】
>>> sht.api.UsedRange.Row
## 1
>>> sht.api.UsedRange.Column
## 1
>>> sht.used_range.column
## 1
>>> sht.api.UsedRange.Row
## 1
>>> sht.api.UsedRange.Column
## 1
In Python xlwings, using the last_cell property of the range object to return the row and column properties of the object can obtain the coordinates of the bottom-right corner cell of the range, i.e., its row number and column number. In Excel VBA and Python xlwings API, the bottom-right corner coordinates of the range can be obtained using the used range of the worksheet.
【Excel VBA】
Set rng = sht.UsedRange
rng.Rows(rng.Rows.Count).Row  			'2
rng.Columns(rng.Columns.Count).Column  	'5
【Python xlwings】
>>> sht.used_range.last_cell.row
## 2
>>> sht.used_range.last_cell.column
## 5
【Python xlwings API】
>>> rng = sht.api.UsedRange
>>> rng.Rows(rng.Rows.Count).Row
## 2
>>> rng.Columns(rng.Columns.Count).Column
## 5
>>> rng = sht.api.UsedRange
>>> rng.Rows(rng.Rows.Count).Row
## 2
>>> rng.Columns(rng.Columns.Count).Column
## 5
In Python xlwings, referencing the shape property of the range object can obtain the shape of the range.
>>> sht.used_range.shape
(2, 5)
In Python xlwings, referencing the size property of the range object can obtain the size of the range.
>>> sht.used_range.size
## 10
Inserting Cells or Ranges
The Insert method of the cell object can be used to insert cells or ranges.
In Python xlwings, the syntax of the insert method is as follows:
Cell or Range Object.insert(shift=None, copy_origin='format_from_left_or_above')shift parameter: Defines the direction of inserting cells or ranges. When the value is down, it means inserting in the vertical direction, and the original data and below move down sequentially; when the value is right, it means inserting in the horizontal direction, and the original data and to the right move right sequentially.
copy_origin parameter: Indicates which adjacent cell or range the format of the inserted cell or range matches. When the value is format_from_left_or_above, it matches the left or upper cell or range; when the value is format_from_right_or_below, it matches the right or lower cell or range.
In Excel VBA and Python xlwings API, the syntax of the Insert method is as follows:
Cell or Range Object.Insert(Shift, CopyOrigin)Shift parameter: Defines the direction of inserting cells or ranges. When the value is xlShiftDown or xw.constants.InsertShiftDirection.xlShiftDown, it means inserting in the vertical direction, and the original data and below move down sequentially; when the value is xlShiftRight or xw.constants.InsertShiftDirection.xlShiftRight, it means inserting in the horizontal direction, and the original data and to the right move right sequentially.
CopyOrigin parameter: Indicates which adjacent cell or range the format of the inserted cell or range matches. When the value is xlFormatFromLeftOrAbove or xw.constants.InsertFormatOrigin.xlFormatFromLeftOrAbove, it matches the left or upper cell or range; when the value is xlFormatFromRightOrBelow or xw.constants.InsertFormatOrigin.xlFormatFromRightOrBelow, it matches the right or lower cell or range.
For the worksheet data shown in Figure 1-18, set the background color of cell A1 to green, and insert cells at A2 and the range B4:C5.
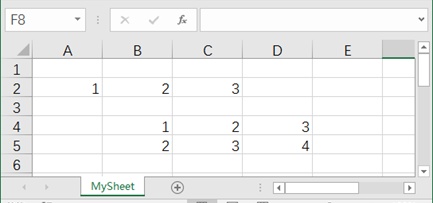
Figure 1-18 Worksheet Data
【Excel VBA】
sht.Range("A1").Interior.Color = RGB(0, 255, 0)
sht.Range("A2").Insert Shift:=xlShiftDown, CopyOrigin:=xlFormatFromLeftOrAbove
sht.Range("B4:C5").Insert
【Python xlwings】
>>> sht.range('A1').color = (0, 255, 0)
>>> sht.range('A2').insert(shift='down', copy_origin='format_from_left_or_above')
>>> sht.range('B4:C5').insert()
【Python xlwings API】
>>> sht.api.Range('A1').Interior.Color = xw.utils.rgb_to_int((0, 255, 0))
>>> sht.api.Range('A2').Insert(Shift=xw.constants.InsertShiftDirection.xlShiftDown, CopyOrigin=xw.constants.InsertFormatOrigin.xlFormatFromLeftOrAbove)
>>> sht.api.Range('B4:C5').Insert()
The worksheet after inserting cells and ranges is shown in Figure 1-19. It can be seen that the inserted cell at A2 copies the format of cell A1. According to the settings, after inserting cells or ranges, the original data and below move down sequentially.
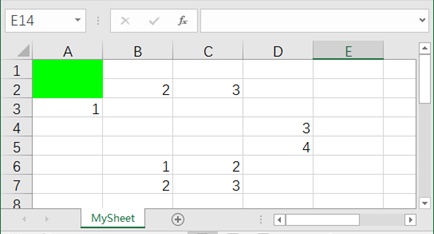
Figure 1-19 Worksheet After Inserting Cells and Ranges
Selecting and Clearing Cells
There are two methods to select cells: activation or selection, implemented by the Activate method (only for Excel VBA and Python xlwings API) or Select method of the cell object.
【Excel VBA】
sht.Range("A1:B10").Select
sht.Range("A1:B10").Activate
【Python xlwings】
>>> sht.range('A1:B10').select()【Python xlwings API】
>>> sht.api.Range('A1:B10').Select()
>>> sht.api.Range('A1:B10').Activate()
To select non-contiguous cells and ranges, simply reference the non-contiguous cells and ranges and activate or select them. Below are the implementation methods in three ways. In Excel VBA and Python xlwings API, the union operation of ranges can also be used.
【Excel VBA】
sht.Range("A1:A5,C3,E1:E5").Activate
sht.Range("A1:A5,C3,E1:E5").Select
Union(sht.Range("A1:A5"), sht.Range("C3"), sht.Range("E1:E5")).Select
【Python xlwings】
>>> sht.range('A1:A5,C3,E1:E5').select()【Python xlwings API】
>>> sht.api.Range('A1:A5,C3,E1:E5').Activate()
>>> sht.api.Range('A1:A5,C3,E1:E5').Select()
>>> pid = xw.apps.keys()
>>> app = xw.apps[pid[0]]
>>> app.api.Union(sht.api.Range('A1:A5'), sht.api.Range('C3'), sht.api.Range('E1:E5')).Select()
The running effect is shown in Figure 1-20.

Figure 1-20 Selecting Non-Contiguous Cells and Ranges
Clearing the content of cells or ranges can be done in multiple ways. Below, we use the Clear method to clear all content.
【Excel VBA】
sht.Range("B1:B5").Clear【Python xlwings】
>>> sht.range('B1:B5').clear()【Python xlwings API】
>>> sht.api.Range('B1:B5').Clear()The ClearContents method can clear the content of the specified cell range.
【Excel VBA】
sht.Range("B1:B5").ClearContents【Python xlwings】
>>> sht.range('B1:B5').clear_contents()【Python xlwings API】
>>> sht.api.Range('B1:B5').ClearContents()The ClearComments method can clear comments.
【Excel VBA】
sht.Range("B1:B5").ClearComments
sht.Range("B1:B5").ClearFormats
【Python xlwings API】
>>> sht.api.Range('B1:B5').ClearComments()
>>> sht.api.Range('B1:B5').ClearFormats()
Copying, Pasting, Cutting, and Deleting Cells
The complete process of copying and pasting a cell range is as follows.
【Excel VBA】
sht.Range("A1").Select
Selection.Copy
sht.Range("C1").Select
sht.Paste
【Python xlwings API】
>>> sht.range('A1').select()
>>> bk.selection.api.Copy()
>>> sht.range('C1').select()
>>> sht.api.Paste()
First, select the cell or range to be copied, use the Copy method to copy data to the clipboard, then select the target cell or range for pasting, and use the Paste method to paste. If the step of selecting cells or ranges is omitted, it can be simplified as follows.
【Excel VBA】
sht.Range("A1").Copy sht.Range("C1")【Python xlwings API】
>>> sht.api.Range('A1').Copy(sht.api.Range('C1'))Where A1 is the source cell and C1 is the target cell.
Next, we copy the current region of cell A1 to the target region with A4 as the top-left cell.
【Excel VBA】
sht.Range("A1").CurrentRegion.Copy sht.Range("A4")【Python xlwings API】
>>> sht.api.Range('A1').CurrentRegion.Copy(sht.api.Range('A4'))The running effect is shown in Figure 1-21.
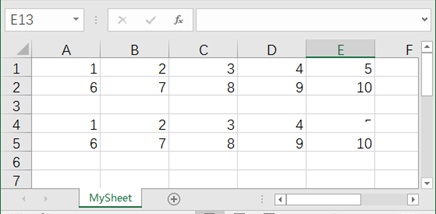
Figure 1-21 Copying the Region to a Specified Location
In Excel VBA and Python xlwings API, the PasteSpecial method of the cell object can be used for selective pasting. The syntax of the PasteSpecial method is as follows:
Cell Range Object.PasteSpecial(Paste, Operation, SkipBlanks, Transpose)
The PasteSpecial method has four parameters:
Paste parameter: Represents the type of selective pasting (its values are shown in Table 1-3).
Operation parameter: Indicates whether to perform operations with the original content during pasting and the type of operation (its values are shown in Table 1-4).
SkipBlanks parameter: Ignore empty cells.
Transpose parameter: Transpose rows and columns of data.
Table 1-3 Values of the Paste Parameter
| Name | Value | Description |
|---|---|---|
| xlPasteAll | -4104 | Paste all content |
| xlPasteComments | -4144 | Paste comments |
| xlPasteFormats | -4122 | Paste the source format of the copy |
| xlPasteFormulas | -4123 | Paste formulas |
| xlPasteFormulasAndNumberFormats | 11 | Paste formulas and number formats |
| xlPasteValues | -4163 | Paste values |
| xlPasteValuesAndNumberFormats | 12 | Paste values and number formats |
Table 1-4 Values of the Operation Parameter
| Name | Value | Description |
|---|---|---|
| xlPasteSpecialOperationAdd | 2 | Copied data will be added to the value in the target cell |
| xlPasteSpecialOperationDivide | 5 | Copied data will be divided by the value in the target cell |
| xlPasteSpecialOperationMultiply | 4 | Copied data will be multiplied by the value in the target cell |
| xlPasteSpecialOperationNone | -4142 | No calculation is performed during pasting |
| xlPasteSpecialOperationSubtract | 3 | Copied data will be subtracted from the value in the target cell |
The following examples illustrate the use of the PasteSpecial method.
The following code copies the data in the first row of the worksheet in Figure 1-21 to the fourth row.
【Excel VBA】
sht.Range("A1:E1").Copy
sht.Range("A4:E4").PasteSpecial Paste:=xlPasteValues
【Python xlwings API】
>>> sht.api.Range('A1:E1').Copy()
>>> sht.api.Range('A4:E4').PasteSpecial(Paste=\
xw.constants.PasteType.xlPasteValues)
The following code first adds a comment to cell B1, then copies the comment in the first row of the worksheet to the fifth row.
【Excel VBA】
sht.Range("B1").AddComment "CommentTest"
sht.Range("A1:E1").Copy
sht.Range("A5:E5").PasteSpecial Paste:=xlPasteComments
【Python xlwings API】
>>> sht.api.Range('B1').AddComment('CommentTest')
>>> sht.api.Range('A1:E1').Copy()
>>> sht.api.Range('A5:E5').PasteSpecial(Paste=xw.constants.PasteType.xlPasteComments)
The following code first adds some formats to cell A2, including setting the background color to green, font size to 20, bold, and italic, then copies the format of the second row of the worksheet to the sixth row.
【Excel VBA】
sht.Range("A2").Interior.Color = RGB(0, 255, 0)
sht.Range("A2").Font.Size = 20
sht.Range("A2").Font.Bold = True
sht.Range("A2").Font.Italic = True
sht.Range("A2:E2").Copy
sht.Range("A6:E6").PasteSpecial Paste:=xlPasteFormats
【Python xlwings API】
>>> sht.range('A2').color = (0, 255, 0)
>>> sht.api.Range('A2').Font.Size = 20
>>> sht.api.Range('A2').Font.Bold = True
>>> sht.api.Range('A2').Font.Italic = True
>>> sht.api.Range('A2:E2').Copy()
>>> sht.api.Range('A6:E6').PasteSpecial(Paste=\
xw.constants.PasteType.xlPasteFormats)
The running effect is shown in Figure 1-22.
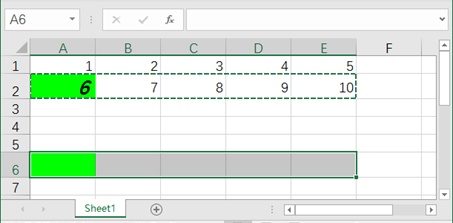
Figure 1-22 Selective Pasting
The cut operation is actually moving the data from the original location after copying and pasting. The Cut method of the cell object can move the content of the source cell to the target cell. Below, we cut the data of range A1:E1 to range A7:E7.
【Excel VBA】
sht.Range("A1:E1").Cut Destination:=sht.Range("A7")【Python xlwings API】
>>> sht.api.Range('A1:E1').Cut(Destination=sht.api.Range('A7'))The parameter name Destination can be omitted, as shown below.
【Excel VBA】
sht.Range("A1:E1").Cut sht.Range("A7")【Python xlwings API】
>>> sht.api.Range('A1:E1').Cut(sht.api.Range('A7'))The delete method of the cell object can delete cells or ranges.
In Python xlwings, the syntax of the delete method is as follows:
rng.delete(shift=None)Where rng is the cell or range object. The value of the shift parameter is "left" or "up". When the value is "up", after deleting the cell, the cells below move up sequentially; when the value is "left", after deleting the cell, the cells to the right move left sequentially. If no parameter is provided, Excel will automatically determine which value to use based on the previous reference.
In Excel VBA and Python xlwings API, the syntax of the Delete method is as follows:
rng.Delete(Shift)Where rng is the cell or range object. When the value of the shift parameter is xlShiftToUp, after deleting the cell, the cells below move up sequentially; when the value is xlShiftLeft, after deleting the cell, the cells to the right move left sequentially. If no parameter is provided, Excel will automatically determine which value to use based on the previous reference.
Below, we delete cell A2 and range C3:E5.
【Excel VBA】
sht.Range("A2").Delete Shift:=xlShiftToUp
sht.Range("C3:E5").Delete
【Python xlwings】
>>> sht['A2'].delete(shift='up')
>>> sht['C3:E5'].delete()
【Python xlwings API】
>>> sht.api.Range('A2').Delete(Shift=xw.constants.DeleteShiftDirection.xlShiftToUp)
>>> sht.api.Range('C3:E5').Delete()
Setting Cell Names, Comments, and Fonts
The Name property of the cell object can be used to get or set the name of a cell or range. Below, we set the name of cell C3 to "test" and reference it using this name.
【Excel VBA】
Set cl = sht.Range("C3")
cl.Name = "test"
sht.Range("test").Select
【Python xlwings】
>>> cl = sht.cells(3, 3)
>>> cl.name = 'test'
>>> sht.range('test').select()
【Python xlwings API】
>>> cl = sht.api.Range('C3')
>>> cl.Name = 'test'
>>> sht.api.Range('test').Select()
Names can also be set for ranges and referenced by name. Below, we name the range A3:C8 "MyData" and reference it using this name.
【Excel VBA】
Set cl = sht.Range("A3:C8")
cl.Name = "MyData"
sht.Range("MyData").Select
【Python xlwings】
>>> cl = sht.range('A3:C8')
>>> cl.name = 'MyData'
>>> sht.range('MyData').select()
【Python xlwings API】
>>> cl = sht.api.Range('A3:C8')
>>> cl.Name = 'MyData'
>>> sht.api.Range('MyData').Select()
The AddComment method of the cell object can add comments to cells. In addition, the Text property of the AddComment method can set the content of the comment.
【Excel VBA】
sht.Range("A3").AddComment Text:="Cell Comment"【Python xlwings API】
>>> sht.api.Range('A3').AddComment(Text='Cell Comment')The Comment property of the cell object can get the comment of the cell. The obtained comment is a Comment object, which has several properties related to comments. These properties can be used to set the comment. Comments is a collection of all Comment objects in the workbook.
Below, we use a judgment structure to check if cell A3 has a comment.
【Excel VBA】
If sht.Range("A3").Comment Is Nothing Then
    Debug.Print "There is no comment in cell A3."
Else
    Debug.Print "There is already a comment in cell A3."
End If
【Python xlwings API】
>>> if sht.api.Range('A3').Comment is None:
    Print('There is no comment in cell A3.')
else:
    Print('There is already a comment in cell A3.')
The Visible property of the Comment object can hide the comment in cell A3.
【Excel VBA】
sht.Range("A3").Comment.Visible = False【Python xlwings API】
>>> sht.api.Range('A3').Comment.Visible = FalseThe Delete method of the Comment object can delete the comment in cell A3.
【Excel VBA】
sht.Range("A3").Comment.Delete【Python xlwings API】
>>> sht.api.Range('A3').Comment.Delete()The Font property of the cell object returns a Font object. Using the properties and methods of the Font object, the font of the text in the cell or range can be set.
The following code sets the font style of the range A1:E1.
【Excel VBA】
sht.Range("A1:E1").Font.Name = "SimSun"  		'Set font to SimSun
sht.Range("A1:E1").Font.ColorIndex = 3  		'Set font color to red
sht.Range("A1:E1").Font.Size = 20  			'Set font size to 20
sht.Range("A1:E1").Font.Bold = True  		'Set font to bold
sht.Range("A1:E1").Font.Italic = True  		'Set font to italic
sht.Range("A1:E1").Font.Underline = _
xlUnderlineStyleDouble  		'Add double underline to text
【Python xlwings API】
>>> sht.api.Range('A1:E1').Font.Name = ';SimSun'      	#Set font to SimSun
>>> sht.api.Range('A1:E1').Font.ColorIndex = 3   	#Set font color to red
>>> sht.api.Range('A1:E1').Font.Size = 20       		#Set font size to 20
>>> sht.api.Range('A1:E1').Font.Bold = True      	#Set font to bold
>>> sht.api.Range('A1:E1').Font.Italic = True      	#Set font to italic
>>> sht.api.Range('A1:E1').Font.Underline = xw.constants.UnderlineStyle.xlUnderlineStyleDouble       								#Add double underline to text
>>> sht.api.Range('A1:E1').Font.Underline = xw.constants.UnderlineStyle.xlUnderlineStyleDouble       								#Add double underline to text
The running effect is shown in Figure 1-23.

Figure 1-23 Font Settings for Cell Range
The settings for underline styles are shown in Table 1-5.
Table 1-5 Underline Style Settings
| Name | Value | Description |
|---|---|---|
| xlUnderlineStyleDouble | -4119 | Thick double underline |
| xlUnderlineStyleDoubleAccounting | 5 | Two thin underlines close together |
| xlUnderlineStyleNone | -4142 | No underline |
| xlUnderlineStyleSingle | 2 | Single underline |
| xlUnderlineStyleSingleAccounting | 4 | Not supported |
Regarding font color settings, there are the following methods:
The first method is to set RGB color, i.e., define colors using red, green, and blue components. Use the Color property of the Font object to set it. If you are used to specifying colors by RGB components, in Excel VBA, use the RGB function; in Python xlwings, use the rgb_to_int method in the xlwings.utils module to convert an RGB component like (255, 0, 0) to an integer value and assign it to the Color property.
【Excel VBA】
sht.Range("A3:E3").Font.Color = RGB(0, 0, 255)【Python xlwings API】
>>> sht.api.Range('A3:E3').Font.Color = xw.utils.rgb_to_int((0, 0, 255))You can also directly assign an integer representing a color to the Color property.
【Excel VBA】
sht.Range("A3:E3").Font.Color = 16711680【Python xlwings API】
>>> sht.api.Range('A3:E3').Font.Color = 16711680  # Or 0x0000FF
>>> sht.api.Range('A3:E3').Font.Color = 16711680 # Or 0x0000FF| Figure 1-24 Color Lookup Table for Indexed Coloring |
The second method is indexed coloring, which requires a color lookup table (as shown in Figure 1-24). The system predefines many colors, each with a unique index number. When performing indexed coloring, assign a certain index number to the ColorIndex property of the Font object.
Below, we set the font color of the range A1:E1 to red.
【Excel VBA】
sht.Range("A1:E1").Font.ColorIndex = 3【Python xlwings API】
>>> sht.api.Range('A1:E1').Font.ColorIndex = 3The third method is to use theme colors. The system predefines many theme colors, which can be conveniently used for font coloring. Each theme color has a corresponding integer number. Assign the necessary number to the ThemeColor property of the Font object.
Below, we set the font color of the range A3:E3 to light blue.
【Excel VBA】
sht.Range("A3:E3").Font.ThemeColor = 5【Python xlwings API】
>>> sht.api.Range('A3:E3').Font.ThemeColor = 5Cell Alignment, Background Color, and Borders
Cell content alignment includes horizontal alignment and vertical alignment, set by the HorizontalAlignment and VerticalAlignment properties of the cell object, respectively.
The values of the HorizontalAlignment property are shown in Table 1-6, and the values of the VerticalAlignment property are shown in Table 1-7.
Table 1-6 Values of the HorizontalAlignment Property
| Name | Value | Description |
|---|---|---|
| xlHAlignCenter | -4108 | Center alignment |
| xlHAlignCenterAcrossSelection | 7 | Center across selection |
| xlHAlignDistributed | -4117 | Distributed alignment |
| xlHAlignFill | 5 | Fill |
| xlHAlignGeneral | 1 | Align by data type |
| xlHAlignJustify | -4130 | Justify |
| xlHAlignLeft | -4131 | Left alignment |
| xlHAlignRight | -4152 | Right alignment |
Table 1-7 Values of the VerticalAlignment Property
| Name | Value | Description |
|---|---|---|
| xlVAlignBottom | -4107 | Bottom alignment |
| xlVAlignCenter | -4108 | Center alignment |
| xlVAlignDistributed | -4117 | Distributed alignment |
| xlVAlignJustify | -4130 | Justify |
| xlVAlignTop | -4160 | Top alignment |
Below, we set the content of cell C3 to horizontal center alignment and vertical center alignment.
【Excel VBA】
sht.Range("C3").HorizontalAlignment = xlCenter
sht.Range("C3").VerticalAlignment = xlCenter
【Python xlwings API】
>>> sht.api.Range('C3').HorizontalAlignment = xw.constants.Constants.xlCenter
>>> sht.api.Range('C3').VerticalAlignment = xw.constants.Constants.xlCenter
If using Python xlwings, you can directly assign a value to the color property of the cell object. The color can be set in RGB format (R, G, B), where R, G, and B range from 0 to 255.
If using Excel VBA and Python xlwings API, use the Interior property of the cell object to set its background color. The Interior property returns an Interior object. Using the Color, ColorIndex, and ThemeColor properties of this object, you can color cells using different methods such as RGB, indexed, and theme colors. For details on these coloring methods, refer to Section 1.5.12; they are not repeated here.
Examples are as follows.
【Excel VBA】
sht.Range("A1:E1").Interior.Color = RGB(0, 255, 0)
sht.Range("A1:E1").Interior.Color = 65280
sht.Range("A1:E1").Interior.ColorIndex = 6
sht.Range("A1:E1").Interior.ThemeColor = 5
【Python xlwings】
>>> sht.range('A1:E1').color = (210, 67, 9)
>>> sht['A:A, B2, C5, D7:E9'].color = (100, 200, 150)
【Python xlwings API】
>>> sht.api.Range('A1:E1').Interior.Color = xw.utils.rgb_to_int((0, 255, 0))
>>> sht.api.Range('A1:E1').Interior.Color = 65280
>>> sht.api.Range('A1:E1').Interior.ColorIndex = 6
>>> sht.api.Range('A1:E1').Interior.ThemeColor = 5
The Borders property of the cell or range object can be used to set borders. The Borders property returns a Borders object. Using the properties and methods of this object, you can set the color, line style, and line width of the borders.
Below, we set borders for the current region of cell B2.
【Excel VBA】
sht.Range("B2").CurrentRegion.Borders.LineStyle = xlContinuous
sht.Range("B2").CurrentRegion.Borders.ColorIndex = 3
sht.Range("B2").CurrentRegion.Borders.Weight = xlThick
【Python xlwings API】
>>> sht.api.Range('B2').CurrentRegion.Borders.LineStyle = \
xw.constants.LineStyle.xlContinuous
>>> sht.api.Range('B2').CurrentRegion.Borders.ColorIndex = 3
>>> sht.api.Range('B2').CurrentRegion.Borders.Weight = \
xw.constants.BorderWeight.xlThick
The border setting effect is shown in Figure 1-25.
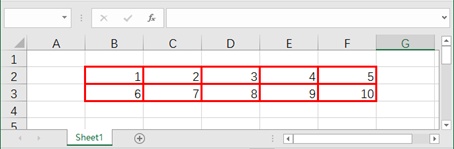
Figure 1-25 Border Setting Effect